
Creating new content is all well and good – but today I want to chat about how to strategically update older blog posts to add value and engagement.
Now if you’ve had a blog for a while, chances are that you’ve got a few older posts that could do with a fresh lick of wordy paint. But how do you identify a blog that’s ripe for a bit of an overhaul? And what can you do to bring it up to speed?
How to Update Old Blog Posts
Step 1: Your Mini Content Audit
If you’re here, chances are you’ve already got some posts in mind for this round of update. Sometimes, that’s just a case of a few isolated tweaks. But if it’s any more than that, it might be worth using this as an opportunity to review all of your older content.
Now carrying out a content audit can be a whole can of worms. But let’s explore a few top level pointers – go through all of your older posts (and their associated analytics) and as you do, ask yourself the following questions:
- Is it indexed in search? Is Google currently indexing this page in Google Search Console? If not, why not? Search console isn’t always the best at telling you why something isn’t indexed, but it can give you some good clues.
- Does it generate site visits? Does this blog bring in new visitors, whether that’s from search, social, or wherever? Is there anything you could do to improve its appeal?
- Does it generate enquiries? Does this post open the door to a potential sales pathway? Is there at least one clear, benefit-driven call-to-action (CTA) presented that makes sense in context?
- Does it keep people engaged? Does the post suffer a high bounce rate or a short engagement time? If so, then it might not be answering an expected question; or it could approach the issue in a way that is unexpected or unhelpful to your readers; or maybe it simply doesn’t entice the reader to take further action!
- Is it accurate? Are there any factual errors or outdated advice shared in this blog? If so, it’s ripe for an update.
- Can it be made clearer? Are there any sections, paragraphs, or sentences that you can make shorter, clearer or more succinct? Are there any places you can include subheadings or bullet points to make things easier for people to skim-read? Are there any large, monolithic chunks of text that could be broken up?
- Is it up to date? Has industry advice changed since the post was written? Can you add new perspectives or practical examples you’ve gathered since then that build on the insights shared? Have any industry norms or technologies shifted since you first published it? Alternatively, has your business or offering changed since it was first published?
- Can you add more multimedia? Visuals always make content more engaging, so can you add any new high-quality images, infographics, or short videos?
- Are any CTAs still relevant? Do the calls-to-action included still align with your sales and marketing goals? Do the functions they link to still work, and lead to relevant and effective sales journeys?
This review should start to give you a useful “to-do” list of content to update. But don’t take off your content-reviewing hat just yet! We’ve got some technical checks to do as well.
Step 2: SEO & Technical Review
Now we’ve considered some of the creative and promotional practicalities, it’s time to review your content from a technical and strategic perspective. If you have access to tools like Google Keyword Planner, Ubersuggest, or Ahrefs, this is a good time to dust those off.
Keyword Refresh
As you go through each post, take stock of the keywords that each blog is optimised for. Are those original keywords still popular, or have search trends changed? Are those terms still relevant to what you do? Have any new, related long-tail keywords or semantically related terms emerged from the woodwork since the piece was first published? Incorporating any new, popular, relevant terms might help to broaden your reach.
Internal Linking
Again, as you review your older posts, you might well find opportunities to link to your newer, more relevant content that didn’t exist when the blog post first emerged. You might even find a few broken links that need replacing. Also, look for opportunities to link from newer posts to this refreshed older post to bolster its authority within your site.
Establish On-Page Essentials
While you’re putting each blog post under a microscope, it’s probably worth investigating how well it’s currently optimised. Tools like Screaming Frog let you look at your website’s technical gubbins and uncover places that might not be technically up to speed. Note that no website is perfect, not even Google or whatever, so we’re not looking for a spotless record here.
But for our content optimisation purposes, you want to find any of the following so you can fix them:
- Page Titles Over 60 Characters
- Page Titles Missing or Too Short
- Error Response Codes
- Images Over 100kb
- Images in Older, Legacy Formats
- Images Missing Alt Text
- Duplicate H2 Headers
- H1 or H2 Headers Over 70 Characters
- Meta Descriptions Missing
- Meta Descriptions Over 155 Characters
Now none of these things are site-breaking issues, but they are things that are well worth addressing now you have the chance to do so.
PageSpeed Insights is another useful tool to run each blog through as you review. It shows you how Google views each individual web page, especially in line with the Core Web Vitals, which Google defines as:
Core Web Vitals is a set of metrics that measure real-world user experience for loading performance, interactivity, and visual stability of the page.
PageSpeed Insights gives you a score across 4 essential metrics, Performance, Accessibility, Best Practices, and SEO. Some of the issues shown will be quite technical, and likely something for your web dev to look at, but there may be some you can handle within your blog boosting quest, like image formats and other presentation particulars.
Step 3: Take Stock & Make a Plan
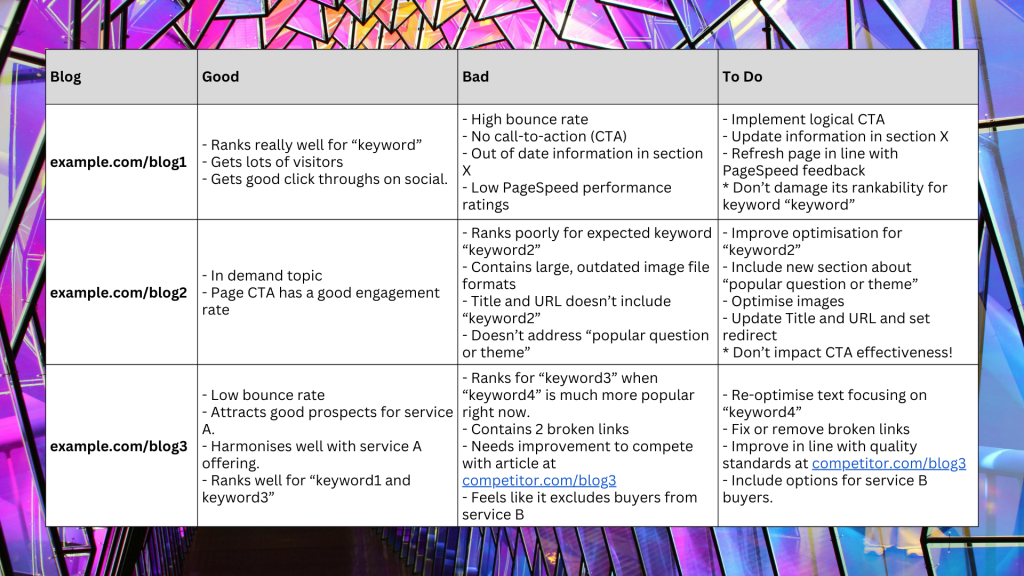
When you’ve earmarked posts to be updated, it’s time to decide and plan out what needs to be done. I love a good spreadsheet for stuff like this. Personally, I would use a spreadsheet to list all blogs that need updating, with columns detailing what’s working well for those posts, what isn’t working so well, and what needs to be changed. Here’s a very quick example:
Step 4: Update Ahoy!
Now it’s time to actually put those proposed updates into practice and out into the world! There are a couple of questions I commonly get asked about this, so here goes.
Do I need to change the publish date on my post?
If you’ve had to make significant updates to your post, such as substantial re-writing, new sections, updated facts, then it’s generally a good idea to update the publish date to reflect its new relevance.
On the other hand, if you’ve just made some minor tweaks; say you’ve updated some image formats, tweaked a sentence here or there, and fixed some broken links; then you’d be fine to keep the original date.
Can I change my blog post title?
If you have a good reason to; say, if you’re focusing on a new, more popular keyword or deprioritising something outdated; then go right ahead! However I don’t like tinkering with titles unless you’ve substantially changed the post, or the title is markedly too long or too short or there’s really something wrong.
If you’ve changed the title, especially if you’ve done it to capture interest in a new keyword, you might be tempted to change the URL too. This isn’t off the table, but it needs to be approached with caution. Changing a post’s URL might break any existing backlinks from other sites and can impact the page’s authority with search engines.
If you feel that a URL change is totally needed, then always implement a redirect from the old URL to the new one. Discuss it with your web developer if you have any doubts.
Step 5: Ongoing Monitoring
Make a note of the time and date that each post was updated. You can use your handy dandy spreadsheet for that. After your refresh, monitor each post’s performance using tools like Google Analytics. Keep an eye out for improvements in organic traffic, keyword rankings, time on page, and bounce rate.
Also see if there are any changes reported within Google Search Console, though it can take a few weeks for Google to pick up your changes, even if you do request re-indexing – we’re on Google’s schedule for that one I’m afraid! Have any of the posts’ indexing status changed? Have your adjustments affected your website’s search trends?
Subscribe to Wordy Wednesday on YouTube